![]()
Properties Extraction & Mapping Tool
The Properties Extraction and Mapping Tool allows you to quickly extract hidden parameters and properties (e.g., Location - X,Y,Z Coordinates) from the model and inject them into existing or new instance parameters.
Core Features
- Extract inaccessible properties/parameters from the model elements and inject them into new or existing instance shared parameters
- Find the hidden properties/parameters in whole model, current view or current selection
- Find the hidden properties/parameters by category/subcategory
- Support properties/parameters: Location Points (Project Base Point, Revit Internal Origin, Survey Point), Connectors, GUID/UniqueID, Flipped face orientation, etc. This point will be explained in more detail in the next section.
Table of contents
‘Select Parameters’ tab
Use this tab to select the properties/parameters to be mapped.
Elements selection and filtering options
This tool comes with a variety of features to help you to quickly select the elements that you want to extract properties/parameters from.
- Whole Model, Active View, and Current Selection
- By Category/Subcategory using the tree view.
- Search bar
Properties/parameters selection and filtering options
This tool comes with a variety of features to help you to quickly select the properties/parameters that you want to extract from the model elements.
- By property/parameter type (e.g., all location properties) and name (e.g., Location Point - XYZ coordinates) using the tree view.
- Search bar
Step by step
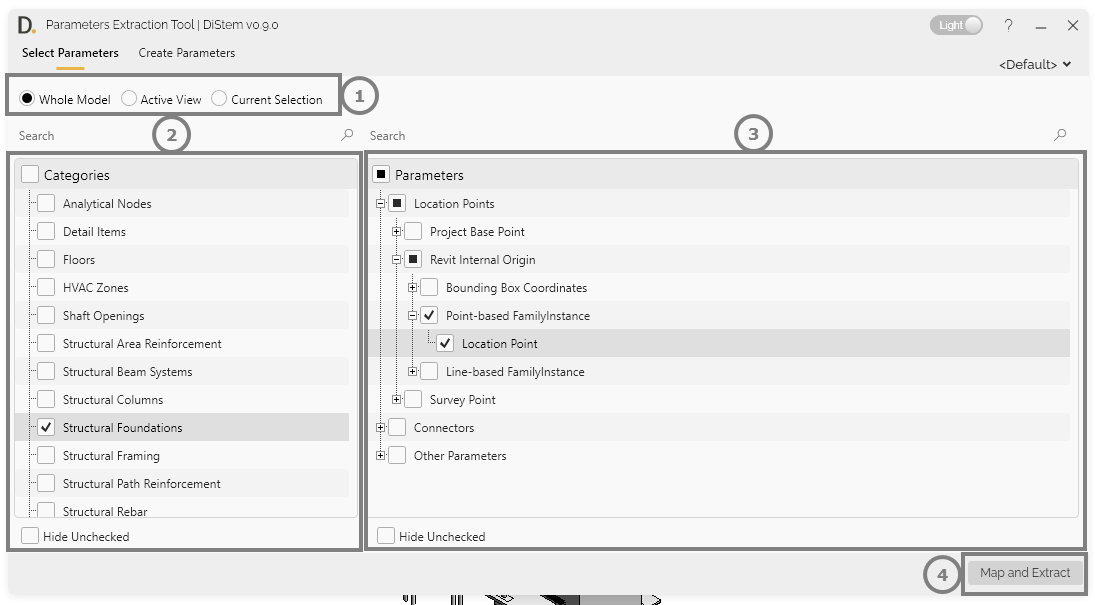
Note: the version on the image may not reflect the latest version of the application.
-
Click radio buttons to collect the elemnts from the Whole Model, Active View, or Current Selection.
-
Use the checkboxes from the tree view to select specific categories/subcategories or use the checkbox in the table header to select all categories/subcategories.
-
Use the checkboxes from the tree view to select specific properties/parameters to be mapped.
-
Click on the ‘Map and Extract’ button to move to the ‘Create Parameters’ tab and start the mapping and extraction process.
‘Create Parameters’ tab
Use this tab to map and extract the properties/parameters into new or existing shared instance parameters.
Step by step
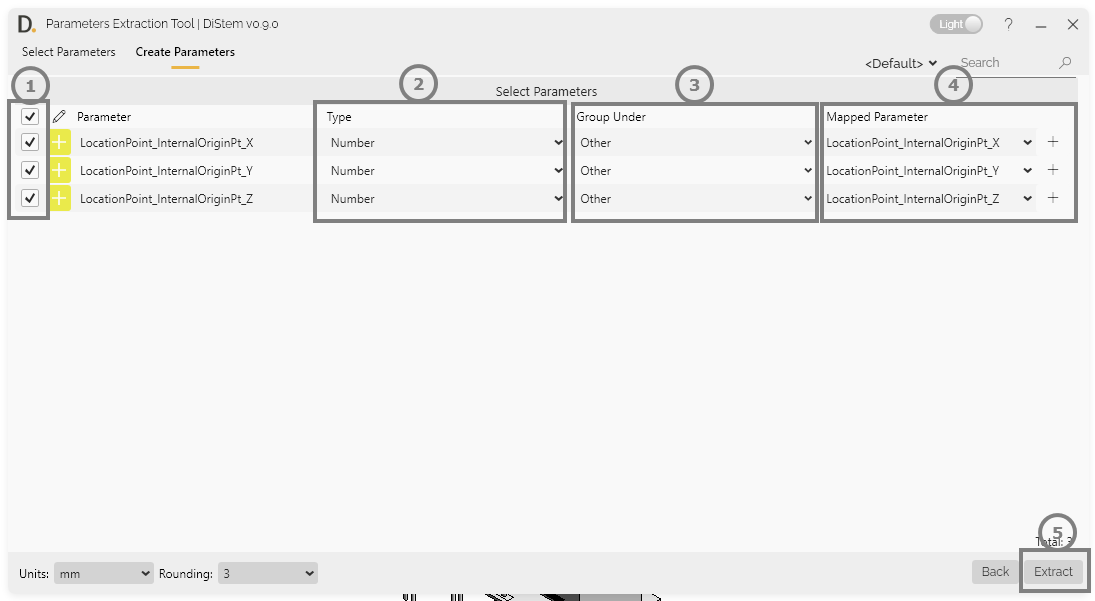
Note: the version on the image may not reflect the latest version of the application.
-
Use the checkboxes from the table view to select specific properties/parameters to be mapped.
-
Select the type of parameter you want to create (default or text).
-
Select the ‘Group Under’. The default value is ‘Other’.
Remarks:
By selecting text you can also set the units and rounding in the bottom-left of the window.
- Select the destination parameter or create new parameter on the fly.
- use the dropdown list to select any shared instance parameter available in the model.
- to create a new parameter, use the ‘+’ button, name the parameter and then click on the save button.
- Click on the ‘Extract’ button to extract and inject the values in the target parameters.
Supported Properties/Parameters
Properties/parameters available:
- Location Points
- Bounding Box Coordinates: retrieves specific coordinates for the points of the box that circumscribes all geometry of the model element.
- Point-based Family Instance: retrieves the location point coordinates (XYZ), which is also the insertion point of the family.
- Line-based Family Instance: retrieves the location point coordinates from specific points in the insertion line of a family instance like pipes, etc.
Remarks:
The 'Bounding Box Coordinates' property returns a bounding box parallel to the cardinal coordinate axes in a project space. So, it does not correspond to the element’s coordinate system and is not necessarily the smallest circumscribing box possible, as the smallest box is not necessarily aligned with the cardinal axes.
-
Connectors: retrieves the location point coordinates for the connectors associated with the model elements.
-
Other parameters/properties:
- Element ID: retrieves a value that is used as a unique identifier for an element within a single project.
- GUID: retrieves a Revit element’s UniqueId, which is used to identify it universally, not only within a single project.
- Flipped Face Orientation: returns a yes/no value as per the face orientation of the families.
- Flipped Hand Orientation: returns a yes/no value as per the hand orientation of the families.
- Mirrored: returns a yes/no value as per the mirror status of the family.
- Flipped Orientation: returns a yes/no value as per the orientation status of the wall.
Remarks:
The 'Flipped Face Orientation', 'Flipped Hand Orientation', and 'Mirrored' properties are useful for objects like doors and windows for determining the handle/swing direction.
- Fabrication Parameters/Properties: retrieves some common useful hidden parameters related to the dimensions of the fabrication part. Some examples, include:
- Diameter(Hanger Rod/Pipe etc.)
- Rod Extn
- Left/Right Extensions
- And multiple other similar useful parameters.
Profiles
What’s saved in the profile
The following settings are saved in the profiles.
- The selection in the ‘Select Parameters’ tab
- The mapping set up in the ‘Create Parameters’ tab
Create Profiles
The profiles feature make it easy to save your settings and reuse them later. It is also a handy way for BIM Managers to create standard rules and share them across the organization.
Steps:

Note: the version on the image may not reflect the latest version of the application.
- Click on the top-right dropdown to open the profiles list.
- Click on the text input and name the profile (give it a meaningful name because this is the name that will show up in the profiles list)
- Click on the save button to save profile.
Import Profiles
The profiles feature make it easy to import existing profiles (e.g., profiles from a shared location).
Steps:
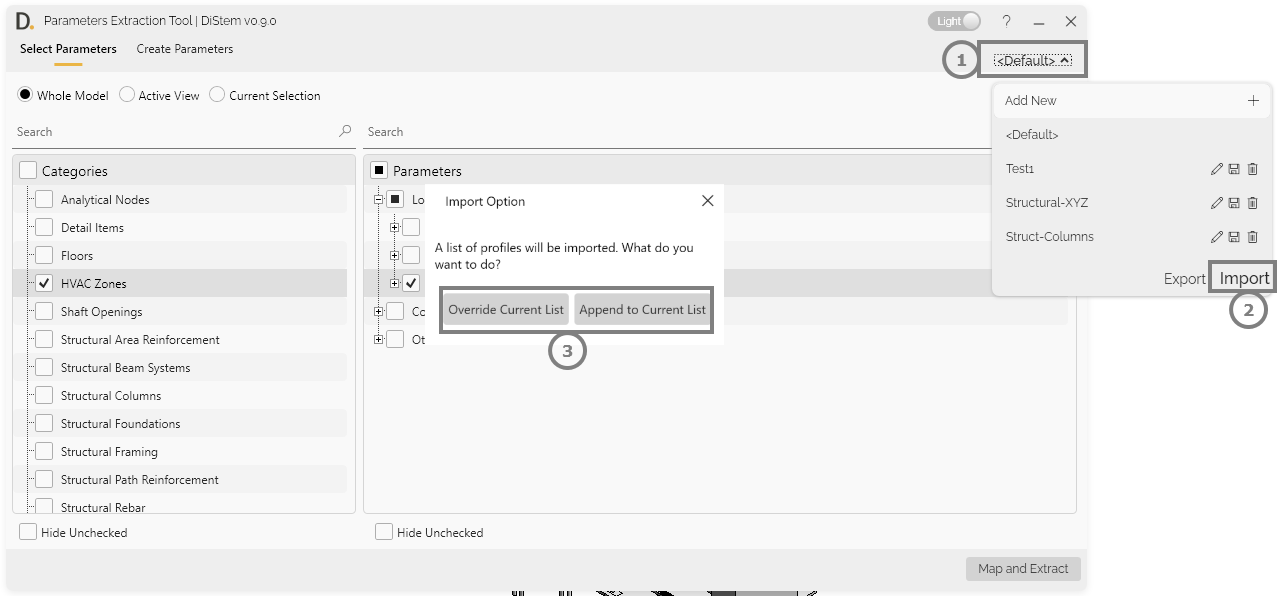
Note: the version on the image may not reflect the latest version of the application.
- Click on the top-right dropdown to open the profiles list.
- Click on the ‘Import’ button.
- Choose if you want to override the current list of profiles or if you want to append the profiles to your current list.
- Select the profiles file to be imported.
Export Profiles
The profiles feature make it easy to export your current list of profiles.
Steps:
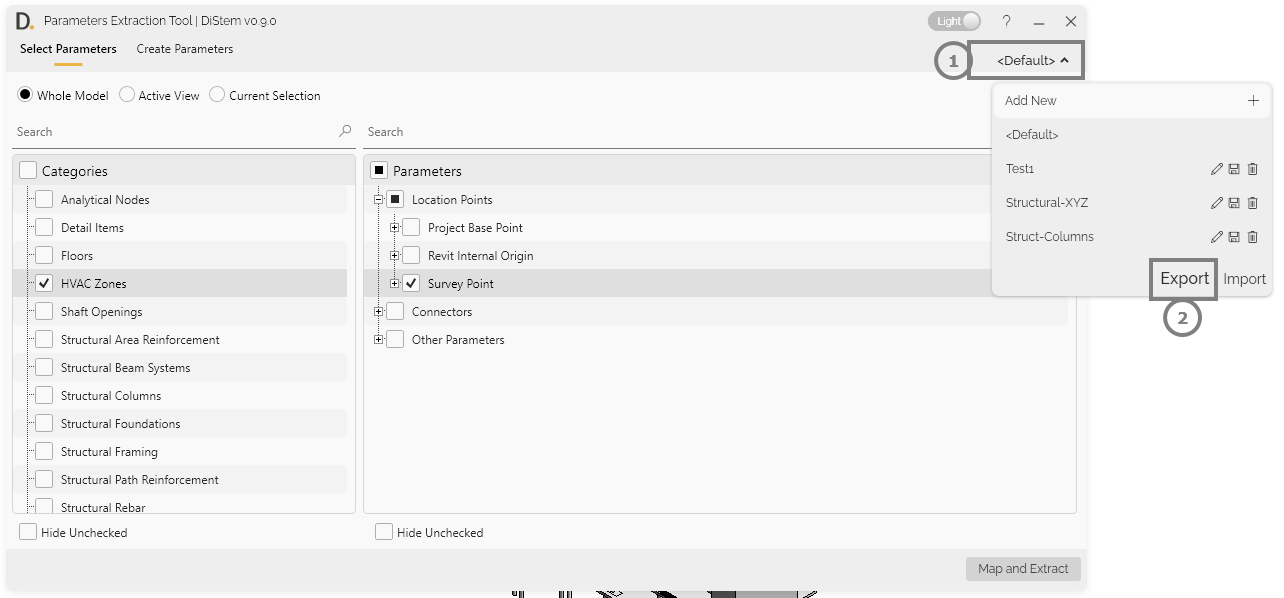
Note: the version on the image may not reflect the latest version of the application.
- Click on the top-right dropdown to open the profiles list.
- Click on the ‘Export’ button.
- Select the folder location and filename.
Delete Profiles
Steps:
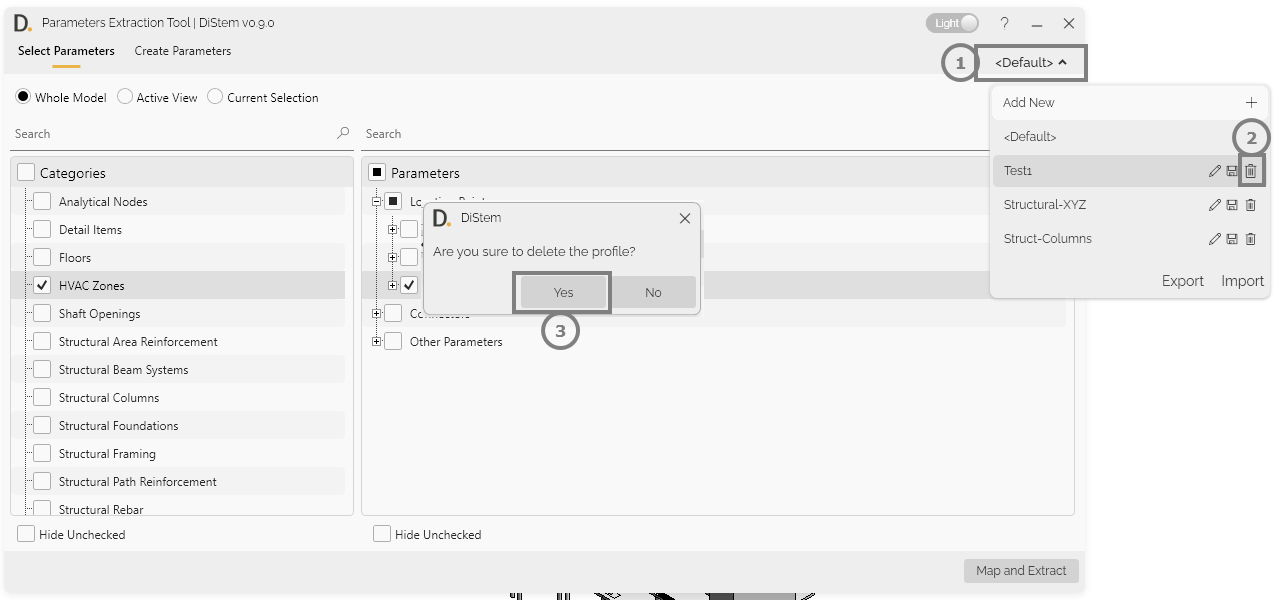
Note: the version on the image may not reflect the latest version of the application.
- Click on the top-right dropdown to open the profiles list.
- Click on the dustbin icon next to the profile you want to delete from the list.
- Click ‘Yes’ to confirm and delete the profile.